If this page seems out of date, please submit a comment at the bottom.
Add Mac Printers
- Wesley Wilson
Mac
PDF Version
These instructions apply to Mac OS X v10.5 or later:
- Collect copier information
- Go to the copier/printer location of the device you want and note the CSU Tag# for Step 4.

- Also note the Model information on the front of the copier (e.g HP LaserJet MFP 500) for step 2.a.ii. and 4.
- Go to the copier/printer location of the device you want and note the CSU Tag# for Step 4.
- Adding the printer server share
Connect to the printer server before you begin.
WARNING
Any time you want to print you will need to connect to the print server using this method.
- Single click your wallpaper or open Finder
- Press CMD+K
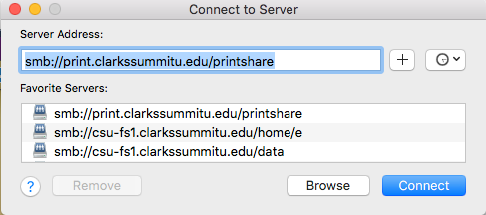
- In the Server Address Window type smb://print.clarkssummitu.edu/printshare
- Press the + button : this will add it to the list in the window below
- Press the Connect button this will connect you to the print server
- Login using your CSU email address and password
- Add the print drivers
- From the now open Finder Window run the appropriate drivers.
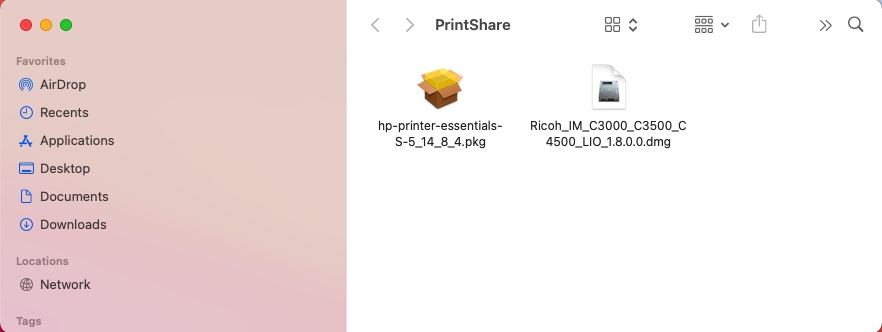
- Install the software following all of the default prompts
- From the now open Finder Window run the appropriate drivers.
- Adding the printer
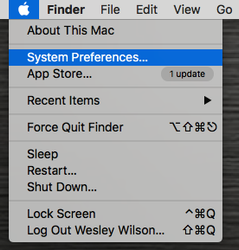
- Choose System Preferences from the Apple menu.
- Choose Printers & Scanners from the Window

- Unlock the Printer & Scanners Window if need be
- Press the + icon to add a printer
- Press the [Control] key while clicking the in the Menu/Title bar of the window
- Select the choose Customize Toolbar from the contextual menu that appears.
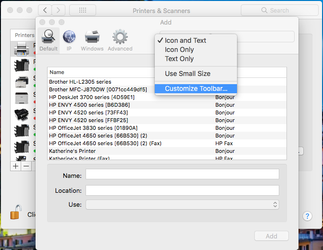
- Drag the Advanced (gear) icon to the toolbar.

- Click [Done].
- Choose System Preferences from the Apple menu.
- Configure the Printer Driver
- Click the [Advanced] icon that was added to the toolbar.
- From the Type Dropdown menu select Windows printer via spoolss
- Wait until the Search is complete
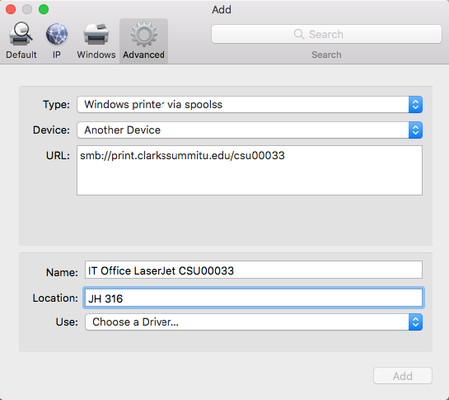
- In the URL field, type the printer url
- This will be a combination of the copiers CSU Tag# (Step 1) and the Server address (Step 2). Do not include the folder name (e.g. PrintShare)
- For example smb://print.clarkssummitu.edu/CSU00012)
- In the Name field,
- Type the name you would like to use to distinguish this printer from others on your Mac
- For example "Business Office Laser Jet CSU00700"
- This is for you and will not impact the setup
- In the Location Field
- Add a location description to help find the printer
- For example "JH316" or "Jackson Hall Room 412"
- This is for you and will not impact the setup
- Choose a Driver from the Use drop down menu
- If the printer is not list from Step one then select "Select Software..."
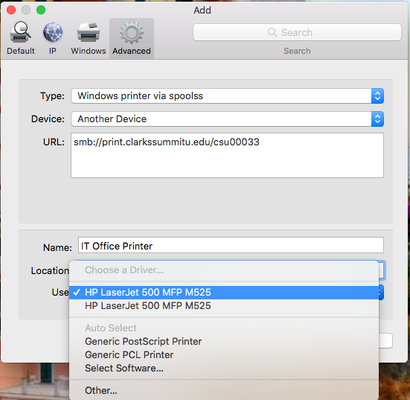
- Type the Model number of the copier in the Filter block (see step 1)
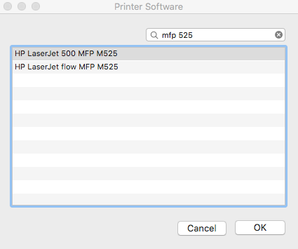
- With the copier driver selected press OK
- Click Add
- If the printer is not list from Step one then select "Select Software..."
- Wait until the Search is complete
- Configure the printer add-ons
- From Step one add the add-ons you noticed.
- A list of add-ons will be coming soon
- Your print should appear in your printer list
- Printer Test
- Press the Open Printer Queue button
- From the Mac menu bar at the top of the screen press Printer
- Select Print Test Page
- The print job should appear in the Printer Queue window, disappear, and then the copier should print a test page
- If successful, you are done. Otherwise try again or submit a helpdesk email ticket.
Additional Apple Support Documents:
http://support.apple.com/kb/HT3049 (Connect to Windows Printer)
http://support.apple.com/kb/HT1568 (Connect to Windows Share)
http://support.apple.com/kb/PH7116 (Connect to Windows Share)
Alternate Driver Download
These are the former steps to download the copier drivers. At this time they do not work because HP has changed their download options and we can only download a wizard that cannot properly setup our printers via PaperCut and the Print Server.
- Download the needed Drivers
- Downloads
- HP Direct Link for 500 series: Click Here
- Alternative:
- https://support.hp.com/us-en/drivers/printers
- Enter the copiers model number and search for the unit
- Download the HP Easy Admin driver finder and download tool. This is the last option often called the basic driver
- Run the tool, locate the driver, download it, install it
- Unzip the application
- Run the HP App
- Search for the driver(s) and download them
- Then install the driver package(s)
- Downloads